|
Creating/Editing Claim Forms |
  
|
|
Creating/Editing Claim Forms |
|
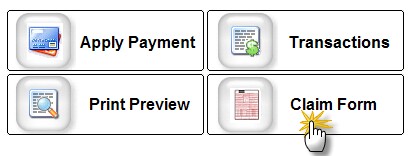
The insurance claim can be created by clicking the Claim Form button on the bottom left side of the FeeSlip. All claim forms must be created from an existing FeeSlip.
You will see the Open Insurance Claim Form which allows you to select a New or Prior claim. You can also select the primary and secondary insurances.
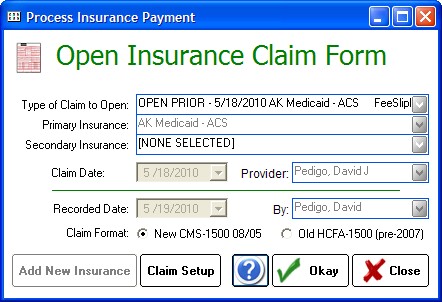
Add New Insurance
You can also add New Insurances with the Settings menu at top of the ezClaimBiller screen (Insurance Plan List).
Claim Setup
The Claim Setup button allows claim defaults and customization to be specified.
Open Claim
Clicking Okay will take you to the onscreen Insurance Claim.
Editing a Claim Onscreen
Once the claim opens, you can edit any field simply by clicking in the appropriate box. Generally this is not required as the Claim is populated with the data from the FeeSlip. But sometimes you may wish to adjust the modifiers or diagnosis pointers to better reflect the level of service.
Diagnosis Pointers and Modifiers
One of the most confusing areas of the claim form is Box 24; entering data incorrectly will most likely result in claim denial.
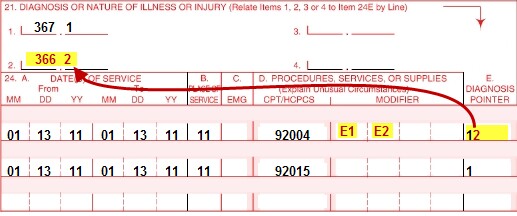
Note that you can enter the individual modifiers in the yellow boxes (they must be separated). And to enter detailed Diagnosis Pointers, enter numbers that match the diagnosis in the top four numbered locations. The numbers should not be separated by commas. So the 92004 code would have a primary diagnosis of 367.1 and a secondary of 366.2. The 92015 code is only tied to the 367.1 diagnosis.
Patient Payments
In many cases you can leave the amount paid by the patient as zero, since the insurance plan will deduct copays irrespective of any values entered. If you wish to enter patient payments, they can be entered directly on the Claim Form in Box 29 (the other boxes will update as necessary to balance).
![]()