|
Exporting Claims |
  
|
|
Exporting Claims |
|
Exporting claims to be electronically processed is a four step process:
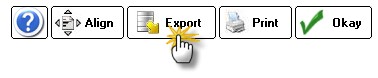
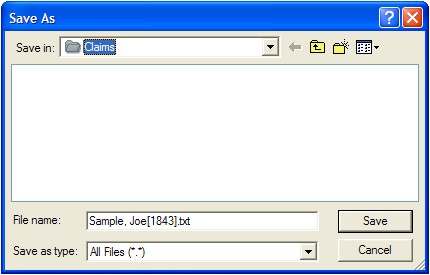
(1) After creating a claim, click the Export button at the top of the form to export it to a file.
You will be asked where to save the file. The default (and recommended) location is the Claims folder located in the ezHW_Data folder. Typically this will be C:\ezHW_Data\Claims\ but the actual location may vary depending on where your database is located on the network.
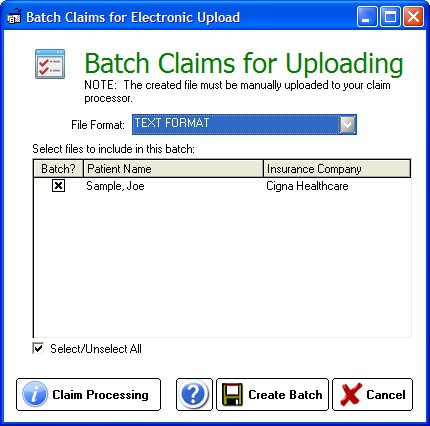
(2) Once you have finished creating claims for the day, you are ready to batch and send. Click the Upload Button on the main ezClaimBiller screen.

The claims are then combined into one large batch file that can be uploaded to the clearinghouse of your choice (there are many free ones; we recommend www.OfficeAlly.com). You must select where to save the batch file (the default location is in a folder called Batch, located in the same place as your Claim folder). You must remember this location as you will need it in Step 3.
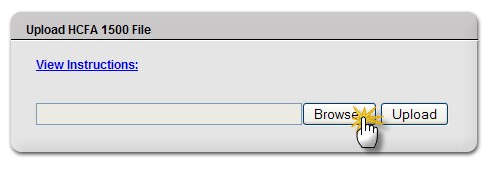
(3) Open your web browser and navigate to the clearinghouse site (e.g. www.officeally.com). Login as usual and you will see the main. Every clearinghouse is different, but using OfficeAlly as an example, here is how to upload the batch file:
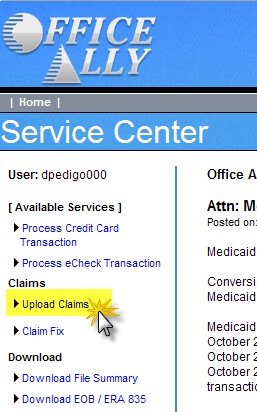
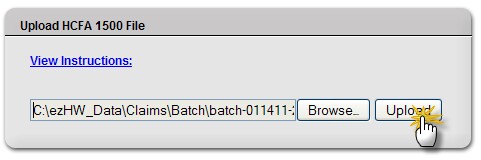
Click the Browse button to locate the batch file on your computer (most likely at C:\ezHW_Data\Claims\Batch, but it could be in a different location if you are using a networked computer). It will be at the location you saved at in Step 2 above.
Once the location is in the box, click the Upload button to send it to the clearinghouse.
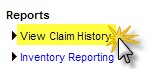
Within moments you should receive a confirmation that the file was uploaded successfully. However, it may take some time to process the file, at which point you should receive notification that the claims were processed. In OfficeAlly you use the View Claim History link to see the status.
Some FAQ's:
Q: Does this software include edits and error correction capabilities?
ANS: No, but OfficeAlly does (see below)
Q: Where do I enter electronic specifications in your program for billing?
ANS: Our software requires sending to an intermediary first (i.e. a clearinghouse). We recommend www.OfficeAlly.com which is free for most claims (Medicare/Medicaid claims may incur a fee).
Q: How do you configure printer settings to conform to the CMS-1500 form, so that it prints properly.
ANS: On the CMS-1500 form display, use the Align Button at the top. It allows font selection (use non-proportional font, like Courier 12pt)
Q: We would like to submit claims through different clearinghouses. For example VSP only uses Eyefinity.com for electronic claim submission. We would like to know if any of the following formats are available for upload through this software. Transaction type 270,837P, 276, 278.
ANS: Currently our software exports a text version of the claim form, which most clearinghouses can easily convert to the X12.837P standard electronic format. We recommend OfficeAlly for that reason.
Q: Is there a way to use downloaded electronic remittance advices and enter these without doing them again by hand?
ANS: No, not currently. You must use the Post Payments button to enter payments you receive.
Q: We currently use ezClaimBiller to print paper forms. How easy is it to go electronic?
ANS: If you are already printing the paper HCFA/CMS-1500 forms, you only need to add a few steps to go electronic. First, you have to sign up with officeally.com or similar EDI clearinghouse. Then use the instructions given in the Help section above to get your first batch created (most clearinghouses will require a 10 claim batch to verify that they are being processed properly; this is done after you first set up your account).