|
Settings & Options |
  
|
|
Settings & Options |
|
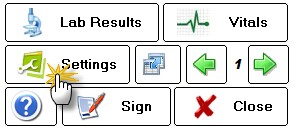
The various options for program operation and user details can be set on the Program Settings & Options screen. Click the Settings button in the Chart Navigation section (or under the Customization menu).
General Settings
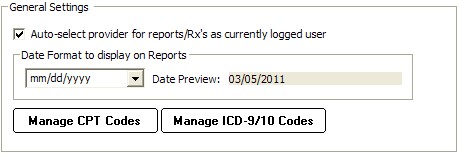
Auto-select provider for reports/Rx's as currently logged user
Determines whether the current user is selected as the provider for certain reports/Rx's.
Date Format for Rx/Reports
Allows customization of the way a date is printed on reports (for example, mm/dd/yyyy format). You may use one of the three predefined formats or create your own.
Manage CPT Codes
All the codes you need to bill for services and products can be entered in the Products & Service Codes screen. Some standard codes are pre-populated, but you will need to edit the Fee and Tax fields to reflect your practice fee schedule.
Manage ICD-9/10 Diagnosis Codes
You can add, delete, or edit the Diagnosis Codes (ICD-9 or ICD-10) using this utility. These codes are used on the FeeSlip in the diagnosis column and in the Assessment/Plan section of an Encounter.
User Details
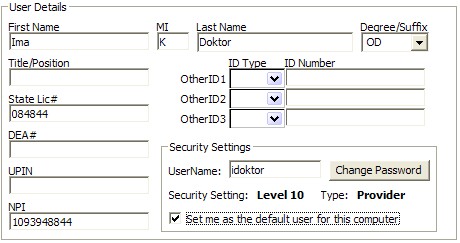
This screen allows the user to modify their own information, including license and insurance ID numbers. Certain items (such as security level and user type) can only be modified in the Admin settings.
User Name/Password
You can change the username here as well as the password (if the current password is known; otherwise the Admin account must be used to reset it)
Security Setting
The user security level is visible (but only modifiable by the System Administrator). The user can, however, change their username or password on this screen.
Set me as the Default user
On each computer (network or solo), the default username displayed at startup ( on the LOGIN screen) is determined by this setting. The user who primarily uses this computer should check this box.
Folder Paths
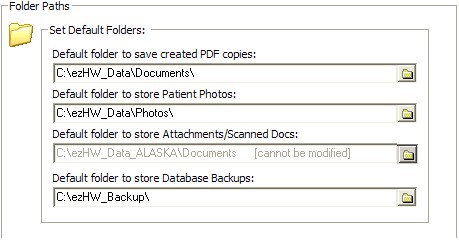
Set default locations for the following folders:
Path to PDF documents
When saving a PDF version of a report or Rx, this is the default location when asked to save file. Typically this would be your "My Documents" folder.
Path to Patient Photos
If you are capturing patient photos to include in the Patient Demographics window, this is the default location to store them. Typically this should be "C:\ezHW_Data\Photos".
Path to Database Backups
The default location where ezBackup stores backup images of your database.
Custom Lists

Throughout ezChartWriter, there are various lists and choices that can be customized. You may edit or add to these lists by performing one of the following:
| • | Selecting list to edit in the dropdown box at the top. |
| • | Clicking on the item to edit, or alternatively, selecting the NEW button to add an item to the list. |
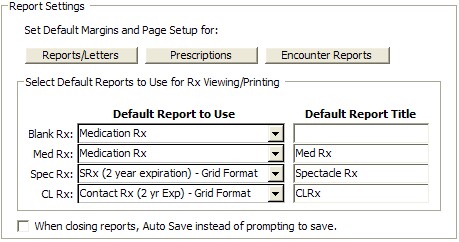
Report Settings
Default Margins
The margin to use for reports, letters, Rx's and encounter printouts (if not set in the Report Designer) or otherwise not specified. This setting applies globally to all reports that do not allow you to set individual margins (e.g. when printing notes).
Default Report to Use
Allows the default report for each Rx type to be selected, as well as setting a default title. The four main Rx categories are: Blank Rx, Medication Rx, Spectacle Rx and Contact Lens Rx.
Auto Save
In some cases, you can specify that the software save your report without being prompted first.
Tool Settings
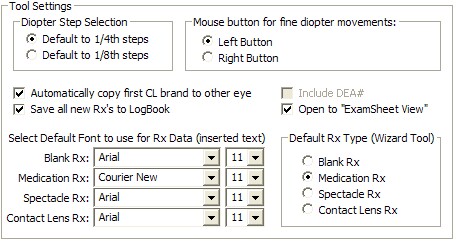
Allows customization of the Rx Tools in ezChartWriter. The available options include the following:
Diopter steps
Applies to spectacle and contact lens Rx’s. Can be either the standard 1/4 steps or in 1/8th steps (rounded to 2 digits however).
Mouse button
For fine adjustments on spectacle or contact Rx tools. Basically, this allows for the reversal of the effect of clicking on the right or left button. The default for fine movements is the left button (i.e. clicking with the left button increments or decrements the power by the default diopter step amount; the right button “jumps” to the clicked location.
Automatically copy first CL brand to other eye
Auto copies the selected contact lens brand from right eye to left (default is true) in the Contact Lens Tool.
Save all new Rx’s to LogBook
Default is true; can be overridden when creating Rx with the Rx wizard.
Set default fonts
Set default fonts for the Rx data being inserted into reports. This can be modified if your reports are exceeding a full page when Rx data is inserted.
Default Rx Wizard
No longer used; the Multi-Medication wizard allows you to select the tool you wish to use.
Custom Chart Settings
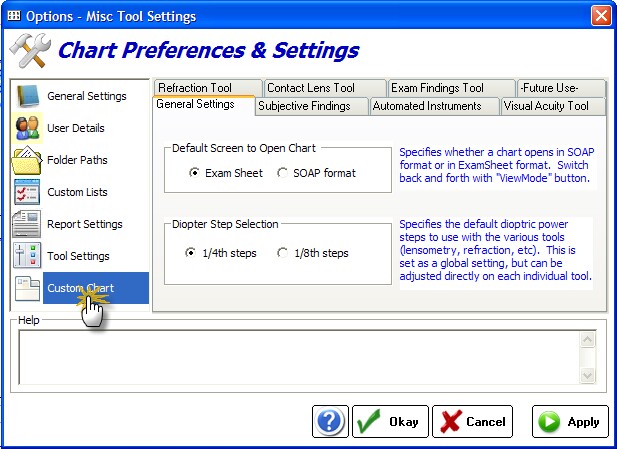
General Settings
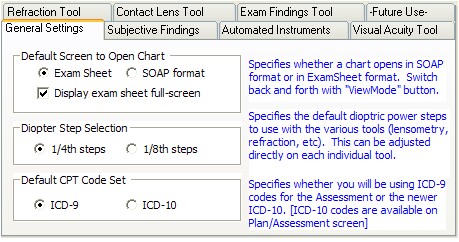
Default Opening Screen
The Encounter can open to either the Exam Sheet or SOAP format when beginning a new charting session. Switch back and forth with "ViewMode" button.
Diopter Step Selection
Specifies the default dioptric power steps to use with the various tools (lensometry, refraction, etc). This can be adjusted directly on each individual tool.
Default ICD Code Set
Specifies whether you will be using ICD-9 codes for the Assessment or the newer ICD-10.
Subjective Findings
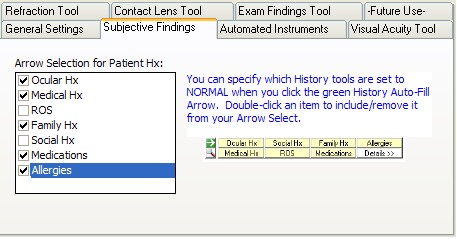
On the Subjective Findings tool, the green arrow next to the patient history section allows for the various sub-sections to be marked "All Normal". This tool lets you indicate what you wish to have
Automated Instruments Settings
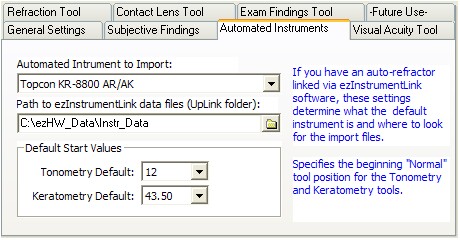
Default Automated Instrument
If you have an auto-refractor/keratometer linked via ezInstrumentLink software, these settings determine the default instrument.
Path to ezInstrumentLink Files
Specifies the path to where the instrument import files are located.
Default Start Values
Specifies the beginning "Normal" tool position for the Tonometry and Keratometry tools.
Visual Acuity Tool Settings

Default Acuity Format
Specifies the format (metric, snellen or decimal) depending on your locale or preference.
Bilateral VA Default
If you routinely include bilateral acuity you can default to 20/20 (or metric equivalent) otherwise it will be left blank.
Refraction Tool Settings
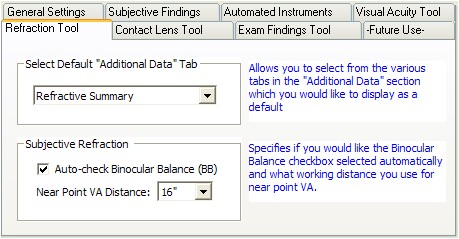
Default Additional Data Tab
Specifies the tab that will display when the Refraction Tool is first opened; typically the Refractive Summary is shown (since it includes any AR/AK/Lensometry data imported or entered).
Binocular Balance
If you routinely do binocular balanced refractions you can have this box auto-check.
Near Point Distance
The default distance (in inches or cm) for the placement of the near point card for visual acuities.
Contact Lens Tool Settings
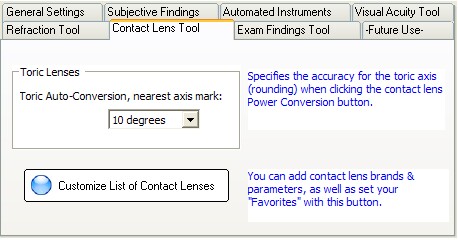
Toric Lens Conversion
When using the "Toric Conversion" button, the nearest axis mark can be indicated (typically 10 degrees).
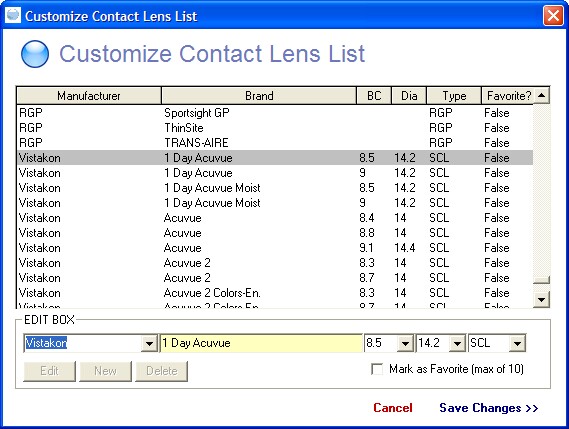
Customize List of Contacts
The list of available contact lenses can be customized. Use the "New" button to add a contact lens. The available parameter fields are: Manufacturer, Brand Name, Base Curve, Diameter and Type (soft or rigid). Use the "Mark as Favorite" checkbox if you would like the contact lens to appear near the top of the list. If you are entering a RGP lens, you can leave the BC/DIA fields blank (to be entered when creating Rx/order).
Exam Findings Tool Settings
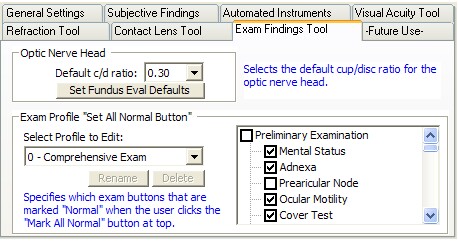
Optic Nerve Head
The default cup-to-disc ratio can be set here.
Fundus Evaluation Defaults
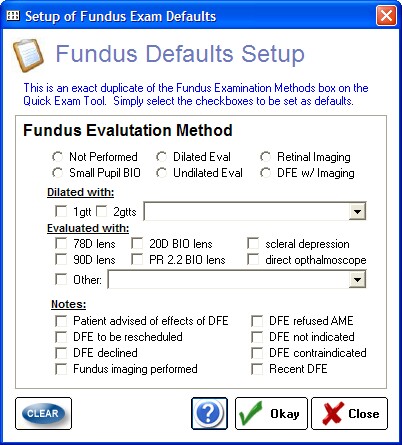
When using the Exam Findings tool, you can set the Fundus Evaluation defaults by clicking the green arrow (pre-fill data). The Defaults Setup is an exact duplicate of this section; simply mark the items you wish to use as your defaults.
Exam Profiles
Specifies which exam buttons that are marked "Normal" when the user clicks the "Mark All Normal" button at top. Select the profile to edit and use the checkboxes on the right-side to mark which items should be marked normal.