|
Automated Instrument Tool |
  
|
|
Automated Instrument Tool |
|
The Automated Instrument tool allows for the numerical entry of auto-refraction, auto-keratometry, non-contact tonometry, and auto-lensometry readings. It is also possible to enter manual readings on this screen (e.g. retinoscopy or manual keratometry). You can also import prior spectacle prescriptions and automated instrument data if you have an instrument attached to your pretest computer.
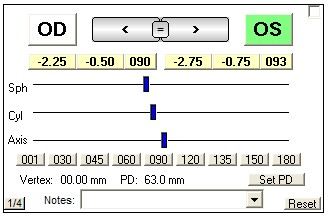
Auto-Refraction
Data can be entered using the standard Diopter Power tool or by having it imported by the Instrument Link button (if the instrument you are using is one that is supported).
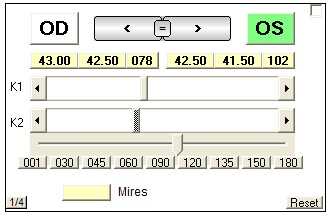
Auto-Keratometry
Use the top two scroll bars to indicate the flat and steep keratometry readings. The axis reading (for K2) is entered by using the slider bar below the two scroll bars. Use the top arrows to switch between the two eyes or the equal sign to copy data from OD to OS. You can enter information about the mires (especially if using a traditional manual keratometer) by clicking the yellow Mires button.
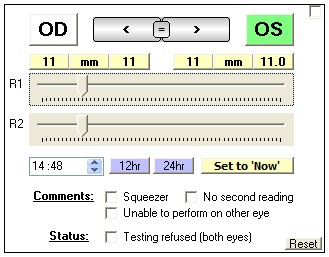
Non-Contact Tonometry
You can enter up to two readings for each eye. Do so by first selecting the eye (click the arrows or large OD/OS button at the top), then use the sliders below to enter the reading. Use the "R1" line for the first reading. The second reading line ("R2") is optional. An average is calculated if you enter more than one reading. To reset a single reading, click the button with the reading you wish to remove (e.g. click the first button in the display to clear the entire display). To indicate that no reading was taken, right-click the button and select No Reading. You can also adjust the time if you wish, otherwise the current time is used.
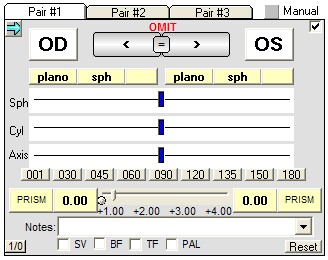
Auto-Lensometry
It is possible to neutralize up to three pairs of spectacles. Use the tabs at the top of the Lensometry section to indicate the pair (proceed in order). See the Diopter Power tool for details on entering prescription data.
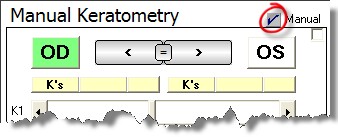
Manual Modes
To convert a tool to indicate Manual Mode, check the "Manual" checkbox on any given tool. The heading will change to remind you that you are entering manual data.
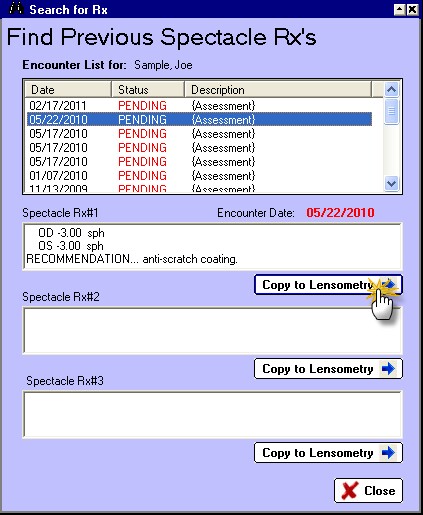
Find Prior Rx
By clicking the Find Prior Rx button you can review previous prescriptions on file and copy them to the currently opened Lensometry tab.

Select the Rx to be copied and click the Copy to Lensometry button.
Instrument Link
If you have an instrument attached to your network and it is one of the instruments supported by ezChartWriter, you can use the Instrument Link button to import the data.

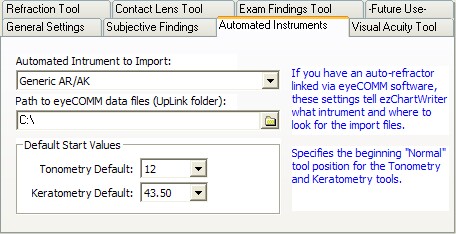
Customize Options
Clicking the Customize button will bring up the Settings screen. The applicable settings for the Automated Instrument tool are the default Tonometry reading and the default Keratometry reading.
Clear
This button resets all tools to their default settings.
