|
Reports & Rx’s |
  
|
|
Reports & Rx’s |
|
Q: When printing spectacle Rx's, I like to print on half sheets of paper, but I have to constantly reset page length and top and bottom margins to do this. How do you print up your Rx's?
A: This can be done in two ways:
| 1) | If you have paper that's already cut in half, just insert the half sheet and the Rx will print just that page (this works if you have a printer that allows half-sheets); you'd have to edit the Rx report as described above to eliminate the second half of the page which on most Rx's is a duplicate. If you are using a laser printer, you also might have to use the secondary feed rather than the tray (although my printer uses the tray fine). I use half sheets like this when printing medication Rx's on security paper. |
| 2) | You can also print on pre-perforated copy paper so you get a duplicate Rx (top and bottom identical). Then tear in half... one copy for patient and one for optician/lab tray. This type of paper can be ordered in bulk from any office supply store (try www.OfficeDepot.com). |
Q: When I print contact lens Rx with follow-up, is there a way to print one that does include continuous (EW) instructions. The one now says lenses are not for EW.
A: All Rx's are really just "reports" which you can edit with the Report Designer. A few Rx's are "system" reports; you can modify them, but you can't delete them. These are the ones that automatically show when you open a new Rx. You can always select a different Rx simply by opening the Rx in the Report Manager. (That's how I open an EW Rx). Note, some Rx's (especially medication and grid-based Rx's open the Rx wizard automatically; simply use the Logbook to find the Rx numbers you need)
Q: When you are about to print the Rx, are the cells automatically populated?
A: Yes. Normally you don't have to enter any additional information.
Q: How do I avoid printing the details of the header thru ezChartWriter because we are printing on the pre-printed letter head.
A: The standard exam printouts (which are generated using File->Print Print Preview in the Encounter) cannot be changed. They are hard-wired in that format. See the Q&A below on how to get around that.
Q: To make some space on top of the report to accommodate the Pre-printed letter's Header lines.
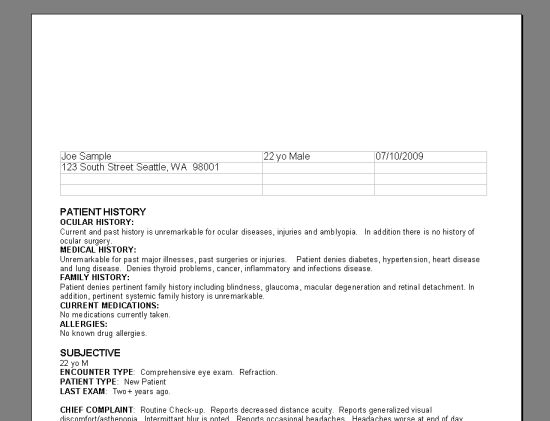
A: You can only make extra space on reports that are available in the "Report Designer". So, you would need to create your own exam report. Do this by opening the Report Designer (in an Encounter, on the top menu click Customize->Customize Letters and Reports). In the dialog box, click on Exam Reports->Encounter Reports - SOAP. Enter a report Title below and leave Blank Report selected. A blank Report Designer screen will appear. Since you need to leave room for your letterhead, use the <Enter> key to move the cursor down far enough. Then insert a Table (menu Table->Insert->Table...), you can enter enough rows and columns to add the date and patient name/address. Just below the table, you need to enter the fields that print the Exam data. Do this by placing your cursor just below the table (you can add some extra lines if you like), then choosing "Exam - Entire SOAP Note" from the drop down list at the top. Then click Insert Field. See the attached screenshots to see what it looks like. Save the new report.
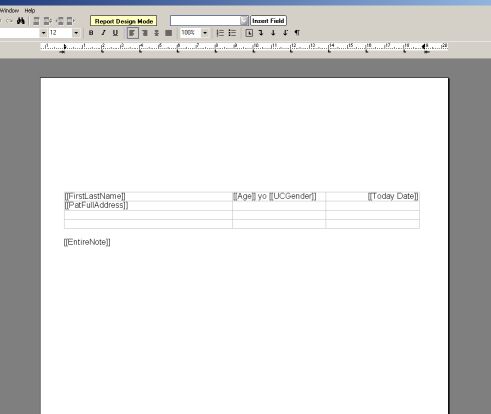
In order to use the report you need to have a chart open with exam data finished. Then on the left side menu click "Report Manager" (don't use the File->Print Preview, as this gives on the standard report). Once the Report Manager opens, select your report type (click Exam Reports, then Encounter Report - SOAP, then click the name of the report your designed in the right-side list. Double-click or click "Select". Your report showing the new format will appear on screen. Once you've designed the report as above, you can open and use it for ANY patient. You can build whatever reports you desire this same way.