|
Using Tables |
  
|
|
Using Tables |
|
Overview
Using the Tables toolbar you can create and edit tables. You can also combine and split cells, color cells, color the table, set the table border-width and color, delete and insert table rows and columns. This feature helps you create anything from simple reports to complex forms.
Working with Tables
To Create a Table in Report Writer
Click Main menu / Table / Insert table. A dialog box will appear allowing you to choose:
the number of columns
the number of rows
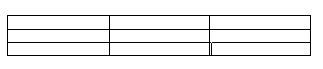
This table has 3 rows, 2 columns, center alignment and a border:
Row 1 Col 1 |
Row1 Col 2 |
Row 2 Col 1 |
Row2 Col 2 |
Row 2 Col 1 |
Row3 Col 2 |
The best way to learn about tables is to create tables in various configurations within a test report.
To Alter a Table
Click inside a table in the report, then activate Main menu / Table . There are several menu choices, enabling you to alter the following table parameters.
Other methods of altering tables
| • | Editing text in tables |
| • | Adjusting column width and position |
| • | Moving a column or row |
| • | Inserting and deleting rows and columns |
| • | Splitting and combining cells |
The proportional width of a table (as a percentage of the report width) can be altered by using the table properties dialog or by dragging the table-handles in the horizontal report ruler.
You can adjust the width of each column by dragging the dividing partition left or right.
To enter text within a table, position the report cursor in the appropriate cell and begin typing.
If you make a mistake in table creation, deletion or typing, you can generally undo your actions by pressing Ctrl+Z or clicking the Undo toolbutton.
To delete a table, position the report cursor anywhere within it and click Main menu / Table / Delete. You will be asked to confirm your action. You can also delete a table without confirmation by inserting a blank line above and below if not already present, highlighting the whole table, including the two blank lines, and pressing Del. Highlighting just the table and pressing Del removes all text within the table but not the table itself. As mentioned above, you can restore a deleted table by pressing Ctrl+Z or clicking the Undo toolbutton.
You cannot easily move, copy , or swap whole columns or rows within a table; you must move each cell individually. For this reason you should design the layout of your table carefully before creating it.
Currently, you cannot create a table within a table.
Editing Text in Tables
Here are some more hints and tips about doing this.
As mentioned previously, text (or images) in one or more cells, rows or columns can be individually aligned (left | right | center) by highlighting it then choosing one of the alignment toolbuttons on the Paragraph toolbar (or via the Edit menu or a keyboard shortcut). Centering text and right-justifying dollars and cents can be very effective.
If you choose left or right alignment, the text will be hard up against the wall of the table, as cell padding is not provided. One workaround is to create extra hidden columns to act as margins.
For example:
Text hard up against left margin |
Add a dummy column |
Then hide its border |
To hide the border, click anywhere in the cell with text, then click the Show left border toolbutton on the Table toolbar to disable it. This will be discussed more fully later. You can drag the Table toolbar off the Toolbars area, making it "float" closer to where you are working.
You can treat text in tables as you would anywhere else in an report. You can cut, copy and paste it.
You can select (highlight) a whole row or column by performing one of the following actions:
| ? | Click-dragging the mouse cursor over it; or |
| ? | Combining the Shift key with the cursor (arrow) keys to select multiple cells just like increasing the size of a highlighted section of text; or |
| ? | Clicking in one cell and selecting the Select table row or Select table column command from Main menu / Table, or choosing the appropriate Table toolbar toolbutton. |
Having highlighted these cells you can apply boldface, italics or color changes to the text or background.
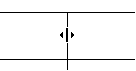
Adjusting Column Width and Position
You can adjust the width and position of any column by dragging the internal vertical partitions left or right. When your mouse cursor passes over a partition, the cursor will change to a pair of vertical bars with arrows:
You cannot drag the horizontal partitions up or down, but you can add extra spaces to the entries in a row, or add a blank row or column.
You may need to adjust the partitions after deleting a column.
Navigating Within a Table
Think of a table as being a block of text that happens to contain vertical and horizontal lines. Use the Tab and arrow cursor keys if you don't want to keep reaching for the mouse all the time. To jump from cell to cell, left to right along a row and top to bottom, press the Tab key. To go in the reverse direction, press Shift+Tab.
The Right arrow key follows the same direction as the Tab key but stops at each character. Similarly, the Left arrow key follows the Shift+Tab key. The Up and Down arrow keys move up and down columns. Note that if you start from outside a table, the Down arrow key will move down the leftmost column and the Up arrow key will move up the rightmost column.
Moving Text, Columns, and Tables
To Move and Copy Text from Cell to Cell
The destination cell need not be an adjacent cell. You can move text anywhere within the table.
Alternatively, you can copy or cut a highlighted block to the Windows Clipboard and paste it in. This can be handy if you need to paste the same text into several cells.
| 1. | Highlight the entire contents of a cell using the cursor keys or the mouse |
| 2. | Drag the highlighted block to the destination cell. |
NOTE: If the destination cell is not empty you can use this method to insert the block into existing text.
To Move a Column or Row
You can only move one cell at a time using the method described in Moving and copying text from cell to cell; you cannot move a whole column or row. For this reason, you should plan your layout carefully before creating the table. However, you can achieve the same end by inserting a new row or column in the destination position, dragging the contents of each cell in the original row or column across to it, then deleting the original.
You can also copy one or more highlighted rows and paste them as separate tables, rearrange them vertically to form a new sequence and then join them. See Moving and copying tables.
To Move and Copy Tables
Whole tables, including contents, can be cut, copied and pasted, just like any other blocks of highlighted text, to and from the Windows Clipboard. They cannot be dragged. You can also copy one or more highlighted rows and paste them elsewhere (outside the table) as a separate table. However, pasting them back only replaces existing text corresponding to the number of rows you pasted in. Instead, create the same number of extra rows, then fill them with inserted text. The following example shows you how:
Example: Insert Table 2 into table 1.
aaaaa Table 1 |
ddddd |
bbbbb Table 2 |
ccccc |
Position the report cursor in the top row (aaaaa) of Table 1, then click the Insert table row toolbutton twice, to insert two rows.
aaaaa Table 1 |
|
|
ddddd |
bbbbb Table 2 |
ccccc |
Now, position the report cursor in the top row (bbbbb) of Table 2, and press Shift+Down to highlight both of its rows. Press Ctrl+C to copy them, then position the cursor on the top blank row in Table 1 and press Ctrl+V to paste the text contents.
aaaaa Table 1 |
bbbbb Table 2 |
ccccc |
ddddd |
bbbbb Table 2 |
ccccc |
Finally, delete Table 2 and tidy up. Done!
aaaaa Table 1 |
bbbbb |
ccccc |
ddddd |
Inserting and Deleting Rows and Columns
To Insert a Row or Column
New rows are added below the selected row. New columns are added to the right of the selected column.
To add a row, select the existing row below which you want the new row to appear. by clicking in it.
Then:
Click the Insert table row icon; or
Click Main menu / Table / Insert table row; or
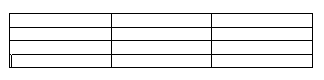
Press the Tab key after positioning the cursor in the rightmost cell of the selected row. This will insert a new table row and move the focus to the first cell of the new row. E.g. (the graphics below are images, not tables):
|
||
Before |
||
|
||
After |
Successive clicking will add more blank rows.
To Delete a Row or Column
If you have just inserted one (blank) row or column too many, you can reverse this by clicking Undo (Ctrl+Z).
Alternatively, to delete a row or column, select it and click the Delete table row toolbutton.
If you need to remove a block of consecutive rows within a table, start at the top row to be deleted and keep clicking the Delete table row toolbutton until the deletion is completed.
Splitting and Combining Cells
To Horizontal Split and Combine Cells
Splitting and combining cells
You can split a cell into two horizontally by adding a partition, or remove it to combine two cells into one. Use the Split table cell and Combine table cells commands in Main menu / Table or corresponding Table toolbar toolbuttons.
Here is a table, originally 3 rows and 2 columns, which has had split and combine operations carried out on the second and third rows respectively.
Cell 1 |
Cell 2 |
Cell 3 |
|
Cells 1 and 2 combined
Splitting columns
To split a column of blank cells into two: highlight the whole column then click the Split table cell toolbutton.
To Vertical Split and Combine Cells
Vertical splitting relies on showing/hiding the top and bottom borders of adjacent cells.
Let's start with a 4-cell table:
Cell 1 |
Cell 2 |
Cell 3 |
Cell 4 |
Figure 1
Think of each cell as having four borders, like this:
Cell 1 |
|
Cell 2 |
Cell 3 |
|
Cell 4 |
Figure 2
To avoid grid thickening, either the upper cell's floor or the lower cell's ceiling may be visible, but not both. (Occasionally you may notice a double thickness grid wall but this will disappear when you return to the report after moving to another node or closing the file, so is an artefact.)
Cell 1 floor visible |
Cell 2 |
Cell 3 ceiling hidden |
Cell 4 |
Figure 3
Cell 1 floor hidden |
Cell 2 |
Cell 3 ceiling visible |
Cell 4 |
Figure 4
Cell 1 floor hidden |
Cell 2 |
Cell 3 ceiling hidden |
Cell 4 |
Figure 5
Note the misalignment in the floors of Cells 1 and 2 in Figure 3 compared with Figure 4, due to different show/hide selections. If you notice this when creating your own tables, ensure that these parameters match across the whole row.
We have thus "combined" cells 1 and 3, so let's add some blank lines and rename the combination Cell 5:
|
|
|
|
Vertical splitting is essentially the reverse of this.
Selecting Rows and Columns
By clicking any cell and then choosing from Select table row or Select table column in the Table menu or the Table toolbar, you can select the whole row or column that includes that cell.
This command is useful if you wish to change the font attributes, colors, etc. of all cells in the row or column, or to clear the contents of the row or column. You cannot use it to copy, move, swap or delete a row or column.
You can also select a whole column, row or block of cells by click-dragging the mouse pointer or by using Shift+cursor keys. See Editing text in tables.
To Select an Entire Table
Clicking anywhere in a table and selecting Main menu / Table / Select entire table will immediately select the whole table, which can be very convenient if you wish to change the same property for all cells or to hide/unhide cell borders for the whole table.
Table and Cell Borders
The right-most eight toolbuttons of the Table toolbar determine whether the borders of the cells selected are visible or hidden. Click any cell and see which of these border toolbuttons are depressed. Clicking any of them again reverses their effect.
Fig. 1: Original
Cell 1 |
Cell 2 |
Cell 3 |
Cell 4 |
This is the original table.
Fig.2: Hide borders
Cell 1 |
Cell 2 |
Cell 3 |
Cell 4 |
This can be reversed by clicking Show borders1.
Fig.3: Show outer border(s)
Cell 1 |
Cell 2 |
Cell 3 |
Cell 4 |
This can can be reversed by clicking Show inner border(s)
Fig.4: Hide borders then Show inner border(s)
Cell 1 |
Cell 2 |
Cell 3 |
Cell 4 |
This can be reversed by clicking Show borders.
Fig.5: Show left border and Show right border disabled in all cells
Cell 1 |
Cell 2 |
Cell 3 |
Cell 4 |
Fig.6: Show top border enabled in lower cells and Show bottom border enabled in upper cells.
Cell 1 |
Cell 2 |
Cell 3 |
Cell 4 |
Combining these borders results in a thicker line which makes a convenient divider.
Fig.7: Show top border disabled in lower cells and Show bottom border disabled in upper cells.
Cell 1 |
Cell 2 |
Cell 3 |
Cell 4 |
Fig.8: Show right border enabled in Cell 1 and Show left border enabled in Cell 2. Show right border disabled in Cell 1 and Show left border enabled in Cell 4.
Cell 1 |
Cell 2 |
Cell 3 |
Cell 4 |
Cells 3 and 4 display the standard configuration as seen in Fig. 1. You would expect that adding Cell 1's right border would cause a thicker partition, but its only effect is to stagger the existing one towards Cell 1. The only remedy is to disable Cell 1's right border.
Notes:
If you highlight a block of text and accidentally click any of the Show ... border toolbuttons your paragraph will display a horizontal or vertical line along one of its borders like part of a table. Doing this deliberately is not recommended as such stray table cell wall lines may cause interference with text and prove difficult to remove.
Table and Cell Color
Report Writer gives you full control over table and cell colors. With the table properties screens you can set the global table color or individual cell colors, as well as the table border-color and border-width.
Table Hints and Tips
To Insert Images into Tables
Tables are a good way to store images, which can be inserted using the Main menu / Insert / Image at Caret Position command. Just like web-pages which owe their neatness to tables with hidden borders, you can hide the table borders once you have finished inserting images. If you wish to display the table frame (also referred to as a grid), you can space the image away from the cell wall by adding a blank line above (press Enter), or by adding spaces.