|
Troubleshooting Network Problems |
  
|
|
Troubleshooting Network Problems |
|
Network Cable Errors
If your computer network cable is not working properly, you will see a repeated message or pop up “network cable is unplugged” on your desktop and the blinking status lights of the network will also stop blinking. There can be many causes of this problem and you can fix this error with these simple tips. If you have another Ethernet adapter installed but not using it, then disable it by right clicking on the monitor icons on the right side of the desktop and select the disable option. Check both ends of the cables and ensure that the RJ 45 connectors are properly inserted in the LAN card and in the Hub/Switch. Update the drive of the LAN card from the vendor’s website and if the problem still exist then replace the cable with new one. If the problem is still not resolved then replace the LAN card with a new one and try to use a new hub or switch and put cable’s one end into it. By these simple steps, you will be able to trace out and troubleshoot the problem.
Basic Network Troubleshooting Tips
The following sections list a series of common networking problems along with solutions that can usually resolve the issue.
Problem: Duplicate computer IDs.
Solution: Make sure that every computer on the network has a unique ID (use Control Panel, Network, Identification to view this information). Otherwise, you'll get an error message when you reboot the workstations with networking cables attached.
Problem: Different workgroup names.
Solution: Make sure every computer that's supposed to be working together has the same workgroup name. The Windows 9x/NT Network Neighborhood and Windows Me/2000/XP My Network Places icons display computers by workgroup name. Different workgroup names actually create different workgroups, and you'd need to access them by browsing via Entire Network. This wastes time.
Problem: Shared resources are not available.
Solution: Make sure that shared resources have been set for any servers on your network. If you can't share a resource through Windows Explorer on the peer server, ensure that File and Printer Sharing has been installed.
Problem: Network doesn't work after making changes.
Solution: Try restarting the computer. This will surprisingly fix many problems!
Problem: A user can't access any shared resources (but others can).
Solution: First, have the user log off and log back on. Next, check cable connections at the server and workstation. Loose terminators or BNC T-connectors can cause trouble for all workstations on a Thinnet cable segment. A loose or disconnected RJ-45 cable affects only the computer (or hub) using it. If a Category 5 UTP cable seems to be connected tightly but the user still can't get on the network, check the cable with a cable tester or replace the cable.
Problem: Wrong access level.
Solution: If you save your passwords in a password cache, entering the read-only password instead of the full-access password limits your access with peer servers. Try unsharing the resource and try to reshare it, or have the user of that peer server set up new full-access and read-only passwords. Alternatively, don't use password caching by unchecking the Save Password box when you log on to a shared resource. With a client/server network with user lists and rights, check with your network administrator because she will need to change the rights for you.
Problem: Unable connect to Internet or other computers.
Solution: Check the router, switch, or hub used to connect the computers to each other and the Internet. It needs to be powered, and the data cables must be properly connected between it and each PC (and between the Internet connection and the switch or hub, if applicable). If your network uses DHCP to dynamically assign IP addresses and the router has lost power or connection, users won't have valid IP addresses. Restart the router, and have all users log off and shut down. When they restart their systems, they should be able to obtain valid IP addresses and connect with each other.
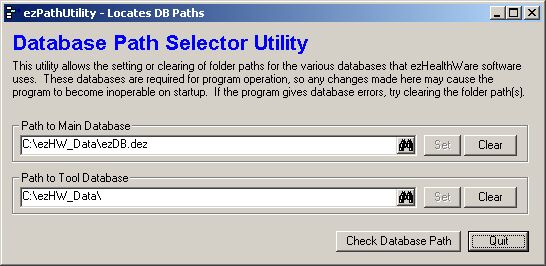
You can confirm that your setting to the database location is correct by using the ezPathUtil.exe program found in the ezUtilities folder (go to C:\Program Files\ezHealthWare\ezUtilities). The path displayed should be the location of your database. Typically the Tool Path should be in the same location, although advanced users can change this location to allow for custom Tool Database on each computer. You can also use this utility to set a new database location.