|
Upload Encounter Data to an EHR Website |
  
|
|
Upload Encounter Data to an EHR Website |
|
In order to qualify for the Medicare/Medicaid bonus payments, you must be using a "certified" EHR product. ezChartWriter, although full-featured, is designed specifically for entering ophthalmic data quickly and easily. We are NOT certified. However, by simply transferring your data into a free, certified one EHR (search Google for "Free online EHR" for examples), you will qualify for payments. Unfortunately, most online solutions do not provide an easy means to enter optical data, especially the numeric data common in refractions. In combination, however, you will get extra benefits that our software alone cannot provide, including a web-based portal for your patients to review their own charts. Used in conjunction with our software, you will have an effective ophthalmic EHR combination.
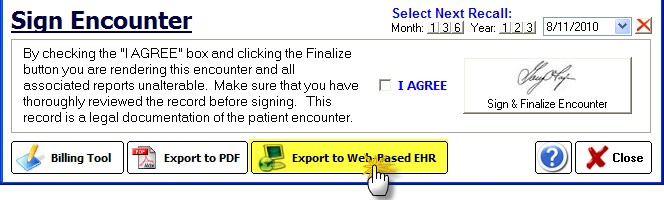
Data can be easily transferred into an online EHR website by clicking the "Export to " button at the bottom of the Sign & Finalize Tool, as show below:
Once the website opens, you must log into your EHR account. Note: If you have yet to create an account, navigate to the website on your browser and sign up. It is a very quick and easy process. The next few times you log in you will be asked additional information about your practice.
Once you arrive at the Main Screen, you need to do two things: (1) Enter the patient demographics, if they do not exist already and (2) copy your SOAP note into the chart (either by entering in each SOAP section or more simply uploading your encounter pdf report).
The following instructions use the website http://www.practicefusion.com* as an example of how to export data to an external site:
*NOTE: "Practice Fusion" is a registered trademark of Practice Fusion, Inc.
ezChartWriter is NOT affiliated with PracticeFusion in any way or form, other than recommending the website as a possible online EHR resource. Furthermore, ezChartWriter does not warranty the suitability of the site and is not responsible for future changes to external websites (including, but not limited to, future fees or lack of access to data).
LIMIT OF LIABILITY: IN NO EVENT WILL EZCHARTWRITER BE LIABLE TO YOU FOR ANY LOSS OF USE; INTERRUPTION OF BUSINESS; OR ANY DIRECT; INDIRECT; SPECIAL; INCIDENTAL; OR CONSEQUENTIAL DAMAGES OF ANY KIND (INCLUDING LOST PROFITS) REGARDLESS OF THE FORM OF ACTION WHETHER IN CONTRACT; TORT (INCLUDING NEGLIGENCE); STRICT PRODUCT LIABILITY OR OTHERWISE.
|
Step 1 - Create Patient Demographics
Click the "Chart" tab at the top of the screen, then click the "Add Patient" on the right top side. NOTE: Even when searching for an existing patient, it is faster to use the "Add Patient" button in in the online EHR.
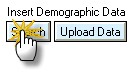
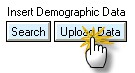
You will see a search screen with First Name, Last Name, Gender and Date of Birth. You can fill the patient name and date of birth by clicking the "Search" button in ezChartWriter.
If a match is found you will see the results, otherwise click the "Create as a New Patient" button near the bottom.
![]()
You can enter the remaining patient demographics if you like by clicking the Upload Data button at the bottom of the ezChartWriter screen or else save with just the starred items since your patient demographics are already in ezChartWriter. We do recommend that you enter the patient ID number in the "Patient Record Number" field. It is copied to the Comment field.
Step 2 - Create SOAP Note and Transfer ezChartWriter Data
SIMPLE METHOD:
The simplest method is to upload the ezChartWriter encounter as a complete PDF file. First, use the "Export to PDF" button and remember where you save the document. Usually this can be accomplished by clicking the "Documents" button at the top of the online patient chart. As an example of how to do this, visit this web location:
http://www.practicefusion.com/pages/document_management.html
You can view or print your document online at any time (after "Signing" them using the Sign button). You can also upload other scanned documents if you wish. You have the flexibility to upload as much or as little as you like.
MORE DIFFICULT METHOD:
Most online EHR products use a standard SOAP note to store data, just like ezChartWriter. To begin (if the patient chart is not already open), click the Charts tab at the top and find the patient for which you wish to enter SOAP data.
Once you are at the Patient Dashboard, click the Patient Actions drop-down and indicate that you wish to create a new chart note. You MUST select the SOAP note format so ezChartWriter data fields can be inserted into the online chart fields.
On the screen you will see the condensed SOAP note. Only the Chief Complaint (CC) field and vital signs are editable on this screen. To insert the Chief Complaint, drag the "Chief Complaint" button from the bottom of the ezChartWriter screen up to the CC box.

To fill in the other SOAP fields, you must click the Subjective field first to get to the detailed SOAP section. Drag the "Subjective" button up to the field, dropping it anywhere in the Subjective box. You data will populate the field. If you make a mistake, simply select the text and use the Delete key to erase. To enter the other SOAP fields, click the letter tabs as appropriate and drag the buttons from the bottom like you did for the Subjective data.
When you have completed the SOAP note, click Save at the top and your note will become part of the online chart for the patient.