|
Drawing Tool |
  
|
|
Drawing Tool |
|
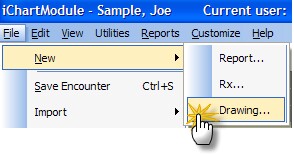
The Drawing Tool can be accessed in two ways: from the main menu (File->New->Drawing) or from the Exam Findings Tool:
"Add New" Drawing Method
The new drawing will be inserted at the end of the Objective field, since it is not associated with a particular category.
Exam Findings Method
(1) Open the Quick Exam Tool
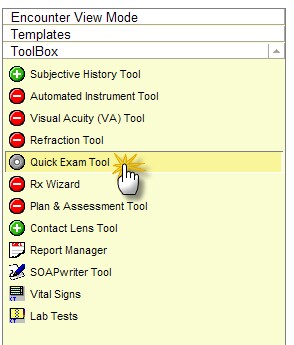
(2) Click on the button associated with the drawing you would like to create (e.g. click Cornea button)
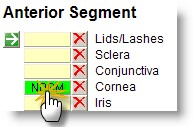
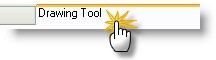
(3) The Detailed Findings Tool will display; click on the Drawing Tab at the top
Using the Drawing Tool
The drawing tool allows you to create drawings and images. Use the Image Template dropdown to select the template most applicable to your drawing or just free-hand draw.
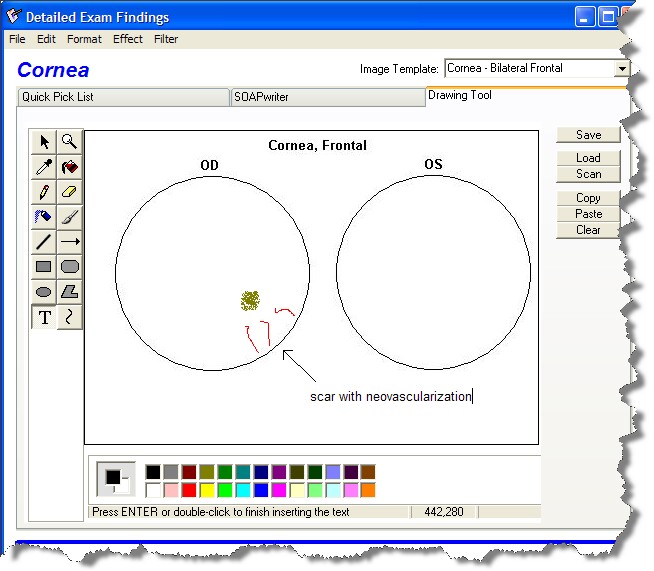
Image Editing Tools
Each icon on the toolbar represent different modes of the program.
Tip: Use ctrl-z to undo an drawing operation
To Color the Background |
|
• Select a color for the background from the color template at the bottom left of the window |
|
• Click the Fill with Color icon |
|
• Click the picture to make the background |
|
To Insert Shapes |
|
• Select a color for the shape from the color template at the bottom left of the window |
|
• Click the Rectangle, Polygon, Ellipse or Rounded Rectangle icon |
|
• Click on your picture and drag to make the figure the size and shape you want. With the Polygon, click the mouse every time you want to change direction and then drag again. |
|
• Click the Fill with Color icon |
|
• Click in the shape to color it |
|
To Paint / Draw |
|
• Select a color for the draw/paint lines from the color template at the bottom left of the window |
|
• Click the Pencil, Brush or Air Brush icon |
|
• With the Brush or Air Brush icons, select the size and shape of the brush strokes at the bottom of the tool bar |
|
• Click and drag on the picture to draw or paint |
|
To Add Text |
|
• Select a color for the text from the color template at the bottom left of the window |
|
• Click the Text icon. You can change the font, size and format in the pop up window that will appear |
|
To Draw Lines |
|
• Select a color for the lines from the color template at the bottom left of the window |
|
• Click the Line or Arrow icon. |
|
• Click and drag to create a line. If you selected the Curve icon, click on the line you just created and drag it to make a curve. |
|
Other Features |
|
• The Eraser icon allows you to erase. After you select it, you can select the size and shape of the eraser |
|
• Select the Magnifier icon to enlarge any part |
|
• Select the Pick Color icon and click on a color you want to copy |
|
• The Select icon allow you to draw around an object/area and move it |
|
The Selection Tool ![]()
These tools are used to select portions of the image you’re working with. These selections can then be moved around, copied, or edited without affecting the rest of the image.
To use the Select tool:
1. Click on the Select tool Icon.
2. With the left mouse button, click and hold the button to begin your selection. Where you click will become one of the corners of the rectangular selection area.
3. Drag the mouse diagonally to where you want the opposite corner of the rectangular area to be.
4. Release the mouse button.
Tip: If you hold down ctrl button when you begin to move a selection, it will create an instant copy which you can then position.
Things you can do with the selected area:
Copy or Cut and Paste
To copy the selection, press Ctrl-C. To cut the selection from the image, press Ctrl-X. After Copying or Cutting, you can Paste the selection by pressing Ctrl-V. By Pasting multiple times, you can achieve a mosaic or collage-like effect.
Move
Left-click anywhere inside the guidebox and hold down the button to "pick up" the selection, and then drag the mouse to move the selection to another area of the image. It will "float" over the rest of the image, allowing you to position it wherever you want it to be. Release the mouse button to "let go" of the selection.
Stretch
The guide box around your selection can be re-sized. Use the menu option Effect->Resize.
Apply Effects
You can apply any of the effects from the Image Menu directly to the active selection rather than to the whole image.
De-selecting
To de-select the area, either activate a different tool by clicking on it in the tool bar, or make a new selection. You can’t have more than one selection active at a time. Once the selection is de-selected, it becomes part of the image again, and will cover over whatever it may have been laying over.
The Eraser Tool ![]()
The Eraser tool is simple to use. Just click on it to select it, then click on the part of the image that you want to erase. "Erasing" changes the erased part of the image back to the background color of the image file. This is usually white, but can be changed to other colors using the color palette.
The fill tool applies color (or "paint") to a large area of the image. The Icon for the Fill Tool resembles a pouring jar of paint. Just like if you were pouring a liquid in real life, the Fill Tool’s "paint" will fill an area’s shape with color.
The Fill Tool ![]()
You have to be careful when using the Fill Tool for this reason: if you click in an unbounded area of the image, the color will "spill" out and fill more of the image than you originally bargained for, possibly obliterating parts of the image that you wanted to save. Look closely before applying the Fill tool to an area to make sure it is bounded on all sides and that no "paint" can "seep out" and get where it’s not supposed to go. If this happens by accident sometime, don’t panic. Just Undo the Fill tool by pressing Ctrl-Z, find the "leak" and close it with the pencil or line tool, and then re-apply the Fill.
The Eyedropper Tool ![]()
The Eyedropper tool has only one function, but it is a useful one. The eyedropper can be used to "pick up" colors that you’ve already used in an image. Say you’re working with an image with many shades of Green. You want to pick a specific shade, but there are several that are so similar that it’s difficult for your eye to distinguish between them. Just click on the eyedropper, and click on the exact portion of the image that contains the color that you want. The active color for your paint tools will automatically change to the color that you picked with the eyedropper. Additionally, the Eyedropper will automatically switch over to the previously selected tool, enabling you to rapidly resuming work on the image with the color you just selected.
Tip: You can use the Eyedropper tool to select color for the background color by using the right button on your mouse.
The Zoom Tool ![]()
The Magnifying Glass, or Zoom tool, can be used to get a closer, more detailed view of an image. This is very useful if you’re working in close with the fine details of a part of an image. When you activate the Magnifying Glass tool, you’ll have an option to select between 1x, 2x, 6x, and 8x magnification. You can click on the part of the image that you want the magnification to center on. This will not affect the actual image in any way, just how it appears on your screen. Once you zoom in, the magnifying glass will automatically switch back to whatever tool you were using before.
The Pencil Tool ![]()
The Pencil tool is your basic drawing tool. You can draw in different colors, but other than that there are no other options. The pencil’s stroke is a single pixel wide, which makes it useful for working with fine details, but a poor choice for filling in large areas of the image with color. You can do simple line drawings with the pencil if you have the coordination to guide the mouse with great care.
The Airbrush Tool ![]()
The airbrush tool is a bit more complicated than the regular paintbrush. Instead of applying color to the image evenly, it applies it gradually. The "spray" is a semi-random distribution of pixels. Gradually, as the airbrush is left hovering over the same area while it is painting, it will fill up with color. A skillful artist can use this effect to create subtle differences in tone and variation, and even achieve the illusion that colors are mixing, all by using the airbrush. It does take some getting used to, however. The airbrush can paint at three different sizes, selected through the Options portion of the Toolbar.
![]()
Options Menu
The Paintbrush Tool ![]()
The Paint Brush tool is similar to the pencil, but has more features. It too can be used in different colors, but the shape and size of the Paint Brush can also be changed. You can use vertical or horizontal shaped brushes, of various sizes, selected in the Options.
The Line Tool ![]()
The Straight Line tool is pretty easy to work with. You can change the color and width of your lines by using the Toolbar Options. All you have to do to draw a line is click on the image where you want one of the line’s endpoints to be, then drag over to where you want the other endpoint to be. Then release the button. Easy! But the lines can only be straight.
The Shape Tool ![]()
The Rectangle tool draws three types of rectangles: outline, filled with outline, and filled without outline. The interior of the outline rectangle is transparent, whereas the filled types fill the rectangle with the background color. To draw a rectangle, click on the tool, then click a point on the image where you want one corner to be, then drag diagonally and release the mouse where you want the opposite corner to be.
The Rounded Rectangle tool is like a cross between the Rectangle Tool and the Oval Tool. It draws rectangles, but instead of having sharp 90 degree angle corners, they’ll be somewhat rounded. As always, you can create rounded rectangles with empty outlines, filled outlines, or filled with no outline.
The Oval Tool works much like the Rectangle tool. The only difference is that since there are no corners, you will need to guess where the corners would be in order to place your oval where you want it to go. Imagine that the oval you are drawing is being "hugged" by a rectangle that goes around it. Like up the top-most and left-most peaks of the oval’s curve to guess where the corner of the imaginary rectangle is and click there. Then, drag down to where the bottom-most and right-most peaks of the oval’s curve would be, and click again. Your oval should be about the right size and in the right position if you estimated it correctly.
The Polygon tool is similar to the rectangle, but works a bit differently. To create a polygon, activate the tool from the tool bar. Then, click on the image wherever you want your first vertice to be. A vertice is like a corner. Draw the edges of the shape like you would use the Straight Line tool, then simply connect the last edge to the first vertice and the shape will finish. You have to be pretty precise, though. If you just miss by a few pixels, the shape will think that you want to continue adding sides to the polygon.
The Text Tool ![]()
The Text tool is used to position and enter text into your image. The text may be of any color or font that you have active on your computer. You also have the option to set the text tool to work so that the background color is used for the "fill space" around the text, or if the text will be applied with transparent "fill space", allowing the image to show through behind the text.
To use the Text tool, simply select it from the Toolbar, and then drag a rectangle within your image. This rectangle will be the boundaries within which the text will appear. Once you’ve drawn the text boundary, a floating window will appear, which will enable you to choose the font, size, and formatting (ie, bold, italic, or underline) for your text. Unfortunately, the text formatting will be uniform. If you want to mix fonts, colors, sizes, or formats, you’ll have to use the text tool several times, with different settings each time. This means you’ll have to be careful in order to make sure that the different applications of text line up properly. You may need to use the selection tool quite a bit to move bits and pieces of text around, and this can be quite tedious. Remember to use the Undo command if you make a mistake, by pressing Ctrl-Z.
As long as the text tool is active, you’ll see that rectangular boundary around the edge of the text area. You can move this rectangle around by clicking and dragging on the very border of it, or resize it by clicking on the tab buttons at the corners and midpoints of the edges. But be careful; if you click outside of the boundary accidentally, which is pretty easy to do, the text box will deselect, and the text tool will think you’re trying to draw a new text box, and your old text will be set in place.
Once the text is in place, it will no longer behave as text, but rather as pixels. The pixels just happen to be in the proper arrangement to appear to be text in some font; they can’t be edited or moved as though a distinct object in the image.
The Curved Line Tool ![]()
The Curved Line tool allows you to draw curved lines. The line is inserted at one time; use the square markers to adjust the size, direction and curve. You can change the color and width of your lines by using the Options box.
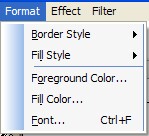
Format Menu
Allows you to adjust border and fill styles, colors and font.
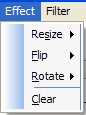
Effects Menu
The Effects menu allows for image (or selection) resizing, flipping and rotating. You can also clear the image.
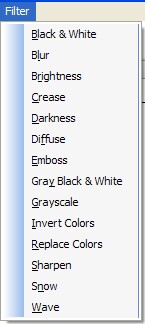
Filter Menu
The Filter menu applies image processing to the entire image (such as brightening, grayscale or blur).
Color Palette
Left click to choose the foreground color, and right click selects the background color. To choose more colors, use the menu item Format.

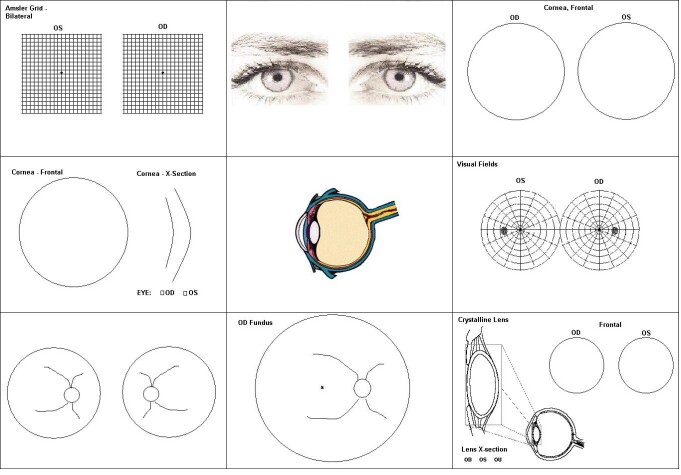
Standard Image Templates
The software has a number of built-in drawing templates. Below is a sampling of some of those templates. You are encouraged to create your own (and feel free to email us a copy so we can add to the database).
How To Insert an Photo
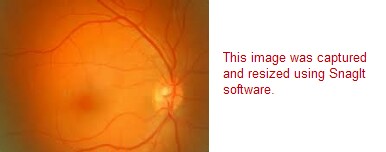
To copy an image (for example, from a retinal photo) that you can annotate, there are two methods:
Option 1: Use the Load button to open the document (or the Scan button to directly import). Note that you will probably need to re-size the image BEFORE attempting to load the image.
Option 2: Use a image capture program (such as SnagIt from www.techsmith.com) to capture the portion of the image you want and resize. Then use the copy/paste function to insert in the drawing.
After the image is inserted you can draw and annotate directly on the image.
Use the ctrl-c (copy) and ctrl-v (paste) key combinations to copy/paste images directly onto the canvas.